
매달, 우리는 1000명 이상의 사람들이 시험 준비를 잘하고 시험을 잘 통과할 수 있도록 도와줍니다.
Nutanix Certified Master Multicloud Infrastructure (NCM-MCI) 6.10 온라인 연습
최종 업데이트 시간: 2026년07월19일
당신은 온라인 연습 문제를 통해 Nutanix NCM-MCI-6.10 시험지식에 대해 자신이 어떻게 알고 있는지 파악한 후 시험 참가 신청 여부를 결정할 수 있다.
시험을 100% 합격하고 시험 준비 시간을 35% 절약하기를 바라며 NCM-MCI-6.10 덤프 (최신 실제 시험 문제)를 사용 선택하여 현재 최신 16개의 시험 문제와 답을 포함하십시오.
정답: To configure the VM to better leverage AHV Turbo, you can follow these steps:
Log in to Prism Element of cluster A using the credentials provided.
Go to VM > Table and select the VM named Turbo.
Click on Update and go to Hardware tab.
Increase the number of vCPUs to match the number of multiqueues that you want to enable. For example, if you want to enable 8 multiqueues, set the vCPUs to 8. This will improve the performance of multi-threaded workloads by allowing them to use multiple processors.
Change the SCSI Controller type from SATA to VirtIO. This will enable the use of VirtIO drivers, which are required for AHV Turbo.
Click Save to apply the changes.
Power off the VM if it is running and mount the Nutanix VirtIO ISO image as a CD-ROM device. You can download the ISO image from Nutanix Portal.
Power on the VM and install the latest Nutanix VirtIO drivers for Windows 10. You can follow the instructions from Nutanix Support Portal.
After installing the drivers, power off the VM and unmount the Nutanix VirtIO ISO image.
Power on the VM and log in to Windows 10.
Open a command prompt as administrator and run the following command to enable multiqueue for the VirtIO NIC:
ethtool -L eth0 combined 8
Replace eth0 with the name of your network interface and 8 with the number of multiqueues that you want to enable. You can use ipconfig /all to find out your network interface name.
Restart the VM for the changes to take effect.
You have now configured the VM to better leverage AHV Turbo. You can run your stress test application again and observe the performance gains.
https://portal.nutanix.com/page/documents/kbs/details?targetId=kA00e000000LKPdCAO
change vCPU to 2/4 ?
Change SATA Controller to SCSI:
acli vm.get Turbo
Output Example:
Turbo {
config {
agent_vm: False
allow_live_migrate: True
boot {
boot_device_order: "kCdrom"
boot_device_order: "kDisk"
boot_device_order: "kNetwork"
uefi_boot: False
}
cpu_passthrough: False
disable_branding: False
disk_list {
addr {
bus: "ide"
index: 0
}
cdrom: True
device_uuid: "994b7840-dc7b-463e-a9bb-1950d7138671"
empty: True
}
disk_list {
addr {
bus: "sata"
index: 0
}
container_id: 4
container_uuid: "49b3e1a4-4201-4a3a-8abc-447c663a2a3e"
device_uuid: "622550e4-fb91-49dd-8fc7-9e90e89a7b0e"
naa_id: "naa.6506b8dcda1de6e9ce911de7d3a22111"
storage_vdisk_uuid: "7e98a626-4cb3-47df-a1e2-8627cf90eae6"
vmdisk_size: 10737418240
vmdisk_uuid: "17e0413b-9326-4572-942f-68101f2bc716"
}
flash_mode: False
hwclock_timezone: "UTC"
machine_type: "pc"
memory_mb: 2048
name: "Turbo"
nic_list {
connected: True
mac_addr: "50:6b:8d:b2:a5:e4"
network_name: "network"
network_type: "kNativeNetwork"
network_uuid: "86a0d7ca-acfd-48db-b15c-5d654ff39096"
type: "kNormalNic"
uuid: "b9e3e127-966c-43f3-b33c-13608154c8bf"
vlan_mode: "kAccess"
}
num_cores_per_vcpu: 2
num_threads_per_core: 1
num_vcpus: 2
num_vnuma_nodes: 0
vga_console: True
vm_type: "kGuestVM"
}
is_rf1_vm: False
logical_timestamp: 2
state: "Off"
uuid: "9670901f-8c5b-4586-a699-41f0c9ab26c3"
}
acli vm.disk_create Turbo clone_from_vmdisk=17e0413b-9326-4572-942f-68101f2bc716 bus=scsi
remove the old disk
acli vm.disk_delete 17e0413b-9326-4572-942f-68101f2bc716 disk_addr=sata.0
정답: To configure the storage for the Citrix-based VDI, you can follow these steps:
Log in to Prism Central using the credentials provided.
Go to Storage > Storage Pools and click on Create Storage Pool.
Enter a name for the new storage pool, such as VDI_Storage_Pool, and select the disks to include in the pool. You can choose any combination of SSDs and HDDs, but for optimal performance, you may prefer to use more SSDs than HDDs.
Click Save to create the storage pool.
Go to Storage > Containers and click on Create Container.
Enter a name for the new container for the non-persistent pool, such as MCS_Pool_Container, and select the storage pool that you just created, VDI_Storage_Pool, as the source.
Under Advanced Settings, enable Deduplication and Compression to reduce the storage footprint of the non-persistent desktops. You can also enable Erasure Coding if you have enough nodes in your cluster and want to save more space. These settings will help you optimize the storage capacity for the non-persistent pool.
Click Save to create the container.
Go to Storage > Containers and click on Create Container again.
Enter a name for the new container for the persistent pool, such as Persist_Pool_Container, and select the same storage pool, VDI_Storage_Pool, as the source.
Under Advanced Settings, enable Capacity Reservation and enter 20 GiB as the reserved capacity. This will guarantee that 20 GiB of space is always available for the persistent desktops. You can also enter 100 GiB as the advertised capacity to limit the maximum space that this container can use. These settings will help you control the storage allocation for the persistent pool.
Click Save to create the container.
Go to Storage > Datastores and click on Create Datastore.
Enter a name for the new datastore for the non-persistent pool, such as MCS_Pool_Datastore, and select NFS as the datastore type. Select the container that you just created, MCS_Pool_Container, as the source.
Click Save to create the datastore.
Go to Storage > Datastores and click on Create Datastore again.
Enter a name for the new datastore for the persistent pool, such as Persist_Pool_Datastore, and select NFS as the datastore type. Select the container that you just created, Persist_Pool_Container, as the source.
Click Save to create the datastore.
The datastores will be automatically mounted on all nodes in the cluster. You can verify this by going to Storage > Datastores and clicking on each datastore. You should see all nodes listed under Hosts.
You can now use Citrix Studio to create your VDI pools using MCS or full clones on these datastores. For more information on how to use Citrix Studio with Nutanix Acropolis, see Citrix Virtual Apps and Desktops on Nutanix or Nutanix virtualization environments.


https://portal.nutanix.com/page/documents/solutions/details?targetId=BP-2079-Citrix-Virtual-Apps-and-Desktops:bp-nutanix-storage-configuration.html
정답: To configure the storage on the cluster for the distributed application, you can follow these steps:
Log in to Prism Element of cluster A using the credentials provided.
Go to Storage > Storage Pools and click on Create Storage Pool.
Enter a name for the new storage pool, such as Distributed_App_Storage_Pool, and select the disks to include in the pool. You can choose any combination of SSDs and HDDs, but for low cost per GB, you may prefer to use more HDDs than SSDs.
Click Save to create the storage pool.
Go to Storage > Containers and click on Create Container.
Enter a name for the new container, such as Distributed_App_Container, and select the storage pool that you just created, Distributed_App_Storage_Pool, as the source.
Under Advanced Settings, enable Erasure Coding and Compression to reduce the storage footprint of the data. You can also disable Replication Factor since data resilience is provided at the application level.
These settings will help you achieve low cost per GB for the container.
Click Save to create the container.
Go to Storage > Datastores and click on Create Datastore.
Enter a name for the new datastore, such as Distributed_App_Datastore, and select NFS as the datastore type. Select the container that you just created, Distributed_App_Container, as the source.
Click Save to create the datastore.
The datastore will be automatically mounted on all nodes in the cluster. You can verify this by going to Storage > Datastores and clicking on Distributed_App_Datastore. You should see all nodes listed under Hosts.
You can now create or migrate your worker VMs to this datastore and run them on any node in the cluster. The datastore will provide low cost per GB and high performance for your distributed application.
정답: This task focuses on Security Technical Implementation Guides (STIGs) and general hardening of the Nutanix cluster. Most of these tasks are best performed via the Nutanix Command Line Interface (ncli) on the CVM, though the SSH key requirement is often easier to handle via the Prism GUI.
Here is the step-by-step procedure to complete Task 2.
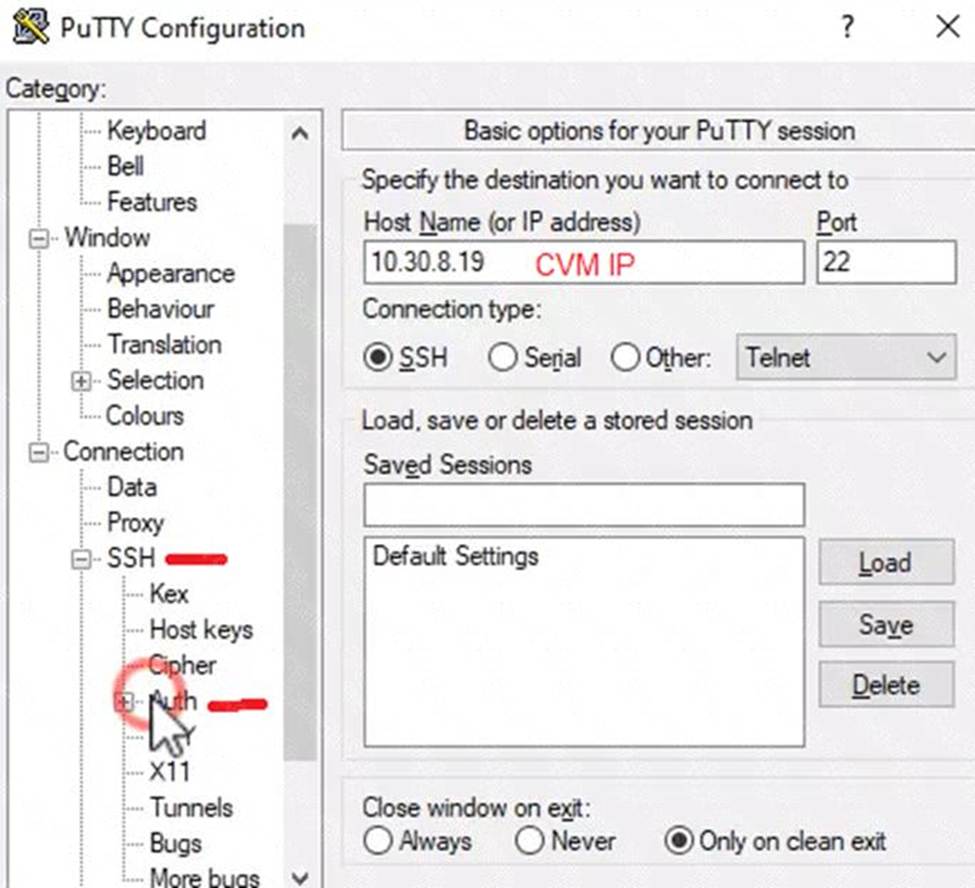
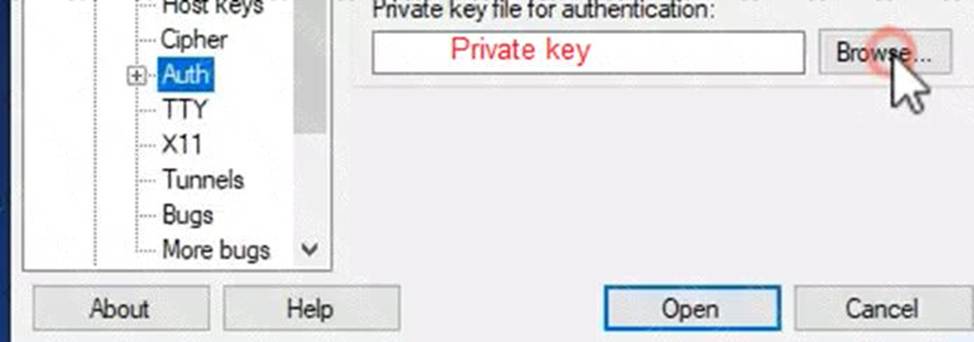
Prerequisites: Connection
Open PuTTY (or the available terminal) from the provided Windows Desktop.
SSH into the Cluster 2 CVM. (If the Virtual IP is unknown, check Prism Element for the CVM IP).
Log in using the provided credentials (usually nutanix / nutanix/4u or the admin password provided in your instructions).
Step 1: Output SCMA Policy (Do this FIRST)
Requirement: Output the cluster-wide configuration of the SCMA policy to desktop\output.txt before changes are made.
In the SSH session on the CVM, run:
Bash
ncli cluster get-software-config-management-policy
Copy the output from the terminal window.
Open Notepad on the Windows Desktop.
Paste the output.
Save the file as output.txt on the Desktop.
Step 2: Enable AIDE (Weekly)
Requirement: Enable the Advanced Intrusion Detection Environment (AIDE) to run on a weekly basis for the hypervisor and CVMs.
In the same CVM SSH session, run the following command to modify the SCMA policy:
Bash
ncli cluster edit-software-config-management-policy enable-aide=true schedule-interval=WEEKLY
(Note: This single command applies the policy to both Hypervisor and CVMs by default in most versions).
Step 3: Enable High-Strength Password Policies
Requirement: Enable high-strength password policies for the hypervisor and cluster.
Run the following command:
Bash
ncli cluster set-high-strength-password-policy enable=true
Step 4: Update Root Password for Cluster Nodes
Requirement: Update the password for the root user on the Cluster 2 node to match the admin user password.
Method A: The Automated Way (Recommended)
Use ncli to set the password for all hypervisor nodes at once without needing to SSH into them individually.
Run:
Bash
ncli cluster set-hypervisor-password
When prompted, enter the current admin password (this becomes the new root password). Method B: The Manual Way (If NCLI fails or manual access is required)
Note: Use this if the exam specifically wants you to touch the node via the 172.x network.
From the CVM, SSH to the host using the internal IP:
Bash
ssh [email protected] (Replace x with the host ID, e.g., 4 or 5)
Run the password change command:
Bash
passwd
Enter the admin password twice.
Repeat for other nodes in Cluster 2.
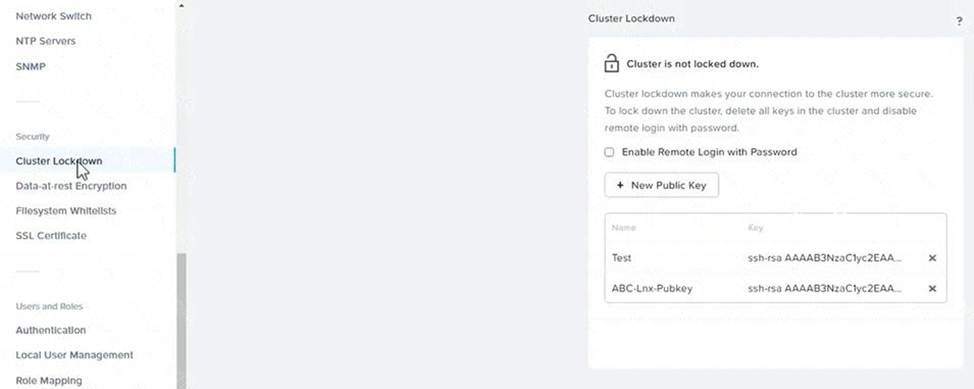
Step 5: Cluster Lockdown (SSH Keys)
Requirement: Ensure CVMs require SSH keys for login instead of passwords.
It is safest to do this via the Prism Element GUI to prevent locking yourself out.
Open Prism Element for Cluster 2 in the browser.
Click the Gear Icon (Settings) -> Cluster Lockdown.
Uncheck the box "Enable Remote Login with Password".
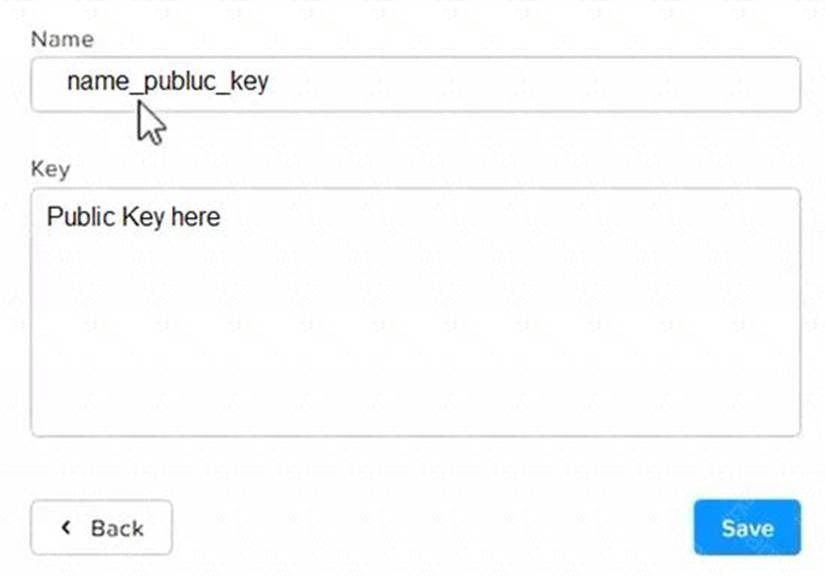
Click New Public Key (or Add Key).
Open the folder Desktop\Files\SSH on the Windows desktop.
Open the public key file (usually ends in .pub) in Notepad and copy the contents.
Paste the key into the Prism "Key" box.
Click Save.
Note: Do not reboot the cluster. The SCMA and Password policies take effect immediately without a reboot.


정답: This is a classic Nutanix performance troubleshooting scenario. The issue is almost certainly that the VM was created using the wrong Disk Bus Type (IDE or SATA instead of SCSI).
Here is the step-by-step solution to complete Task 1.
Part 1: Analysis and Reporting
Create the Session
Log in to Prism Central (or Prism Element, depending on the exam environment, but Analysis is usually a PC feature).
Navigate to Operations -> Analysis.
Click New Session.
Name: Monitor SQL02
Entity: Search for and select the VM named SQL02.
Metrics: Since the issue is storage performance, search for and add these specific metrics:
Hypervisor IOPS (or Controller IOPS)
Hypervisor IO Latency (or Controller IO Latency)
Hypervisor IO Bandwidth
Click Save.
Save Session Data (Task 1.txt)
Open the "Monitor SQL02" session you just created.
(Per instructions): Right-click anywhere on the chart/data area -> Click Select All.
Copy the selected text (Ctrl+C).
Open Notepad on the provided desktop.
Paste the data.
Save the file as Task 1.txt on the Desktop.
Create and Schedule the Report
While still in the Analysis session, click the Create Report (or "Add to Report") button.
Report Name: MonitorSQL02
Report Settings:
Format: PDF
Frequency: Daily
Email Recipient: [email protected]
Retention: 0 (or "Do not retain", as requested).
Note: If the system forces you to create a new Report object and MonitorSQL02 is rejected, use monitorvm2 as the name per the instructions.
Save/Schedule the report.
Part 2: Diagnose and Fix the Issue
The Issue:
VM SQL02 was likely created with its data disks set to IDE or SATA.
Why this causes poor performance: IDE/SATA are emulated hardware with high CPU overhead and low queue depths (single-threaded).
The Standard: SQL01 (the healthy VM) is using SCSI, which is multithreaded and optimized for virtualization.
The Fix (Steps):
Navigate to the VM list in Prism.
Select SQL02 and click Update (or Edit).
Scroll down to the Disks section.
Identify the data disk(s). You will see the Bus Type listed as IDE or SATA.
Do not delete the VM. instead, perform a disk conversion (destructive change to the disk is allowed, but we want to keep the data).
Method to Convert (Clone to SCSI):
Hover over the IDE/SATA disk to see the path/filename of the vDisk (or write it down).
Click Add New Disk.
Operation: select Clone from ADSF file.
Path: Browse to the storage container and select the file associated with the current IDE disk.
Bus Type: Select SCSI (This is the critical fix).
Index: Ensure it doesn't conflict with existing disks (usually index 1 or higher for data).
Click Add.
Once the new SCSI disk is added, find the original IDE/SATA disk and click the X to remove it.
Click Save.
Note: You do not need to power on the VM to verify. The change from IDE to SCSI allows the VM to use the Nutanix VirtIO drivers for maximum storage performance
정답: To correct the issue of cluster services down on Controller VM (35.197.75.196) in the least disruptive manner, you need to do the following steps:
Log in to Prism Element using the admin user credentials.
Go to the Alerts page and click on the alert to see more details.
You will see which cluster services are down on the Controller VM. For example, it could be cassandra, curator, stargate, etc.
To start the cluster services, you need to SSH to the Controller VM using the nutanix user credentials. You can use any SSH client such as PuTTY or Windows PowerShell to connect to the Controller VM. You will need the IP address and the password of the nutanix user, which you can find in Desktop\Files\SSH\nutanix.txt.
Once you are logged in to the Controller VM, run the command:
cluster status | grep -v UP
This will show you which services are down on the Controller VM.
To start the cluster services, run the command:
cluster start
This will start all the cluster services on the Controller VM.
To verify that the cluster services are running, run the command:
cluster status | agrep -v UP
This should show no output, indicating that all services are up.
To clear the alert, go back to Prism Element and click on Resolve in the Alerts page.
To meet the security requirements for cluster level security, you need to do the following steps:
To update the default password for the root user on the node to match the admin user password, you need to SSH to the node using the root user credentials. You can use any SSH client such as PuTTY or Windows PowerShell to connect to the node. You will need the IP address and the password of the root user, which you can find in Desktop\Files\SSH\root.txt.
Once you are logged in to the node, run the command:
passwd
This will prompt you to enter a new password for the root user. Enter the same password as the admin user, which you can find in Desktop\Files\SSH\admin.txt.
To update the default password for the nutanix user on the CVM to match the admin user password, you need to SSH to the CVM using the nutanix user credentials. You can use any SSH client such as PuTTY or Windows PowerShell to connect to the CVM. You will need the IP address and the password of the nutanix user, which you can find in Desktop\Files\SSH\nutanix.txt.
Once you are logged in to the CVM, run the command:
passwd
This will prompt you to enter a new password for the nutanix user. Enter the same password as the admin user, which you can find in Desktop\Files\SSH\admin.txt.
To resolve the alert that is being reported, go back to Prism Element and click on Resolve in the Alerts page.
To output the cluster-wide configuration of SCMA policy to Desktop\Files\output.txt before changes are made, you need to log in to Prism Element using the admin user credentials.
Go to Security > SCMA Policy and click on View Policy Details. This will show you the current settings of SCMA policy for each entity type.
Copy and paste these settings into a new text file named Desktop\Files\output.txt.
To enable AIDE (Advanced Intrusion Detection Environment) to run on a weekly basis for the cluster, you need to log in to Prism Element using the admin user credentials.
Go to Security > AIDE Configuration and click on Enable AIDE. This will enable AIDE to monitor file system changes on all CVMs and nodes in the cluster.
Select Weekly as the frequency of AIDE scans and click Save.
To enable high-strength password policies for the cluster, you need to log in to Prism Element using the admin user credentials.
Go to Security > Password Policy and click on Edit Policy. This will allow you to modify the password policy settings for each entity type.
For each entity type (Admin User, Console User, CVM User, and Host User), select High Strength as the password policy level and click Save.
To ensure CVMs require SSH keys for login instead of passwords, you need to log in to Prism Element using the admin user credentials.
Go to Security > Cluster Lockdown and click on Configure Lockdown. This will allow you to manage SSH access settings for the cluster.
Uncheck Enable Remote Login with Password. This will disable password-based SSH access to the cluster.
Click New Public Key and enter a name for the key and paste the public key value from Desktop\Files\SSH\id_rsa.pub. This will add a public key for key-based SSH access to the cluster.
Click Save and Apply Lockdown. This will apply the changes and ensure CVMs require SSH keys for login instead of passwords.
Part1
Enter CVM ssh and execute:
cluster status | grep -v UP
cluster start
If there are issues starting some services, check the following:
Check if the node is in maintenance mode by running the ncli host ls command on the CVM. Verify if the parameter Under Maintenance Mode is set to False for the node where the services are down. If the parameter Under Maintenance Mode is set to True, remove the node from maintenance mode by running the following command:
nutanix@cvm$ ncli host edit id=<host id> enable-maintenance-mode=false
You can determine the host ID by usingncli host ls.
See the troubleshooting topics related to failed cluster services in the Advanced Administration Guide available from the Nutanix Portal'sSoftware Documentationpage. (Use the filters to search for the guide for your AOS version). These topics have information about common and AOS-specific logs, such as Stargate, Cassandra, and other modules.
Check for any latest FATALs for the service that is down. The following command prints all the FATALs for a CVM. Run this command on all CVMs.
nutanix@cvm$ for i in `svmips`; do echo "CVM: $i"; ssh $i "ls -ltr /home/nutanix/data/logs/*.FATAL"; done
NCC Health Check: cluster_services_down_check (nutanix.com)
Part2
Vlad Drac2023-06-05T13:22:00I'll update this one with a smaller, if possible, command
Update the default password for the rootuser on the node to match the admin user password
echo -e "CHANGING ALL AHV HOST ROOT PASSWORDS.\nPlease input new password: "; read -rs password1; echo "Confirm new password: "; read -rs password2; if [ "$password1" == "$password2" ]; then for host in $(hostips); do echo Host $host; echo $password1 | ssh root@$host "passwd --stdin root"; done; else echo "The passwords do not match"; fi
Update the default password for the nutanix user on the CVM
sudo passwd nutanix
Output the cluster-wide configuration of the SCMA policy
ncli cluster get-hypervisor-security-config
Output Example:
nutanix@NTNX-372a19a3-A-CVM:10.35.150.184:~$ ncli cluster get-hypervisor-security-config
Enable Aide : false
Enable Core : false
Enable High Strength P... : false
Enable Banner : false
Schedule : DAILY
Enable iTLB Multihit M... : false
Enable the Advance intrusion Detection Environment (AIDE) to run on a weekly basis for the cluster.
ncli cluster edit-hypervisor-security-params enable-aide=true
ncli cluster edit-hypervisor-security-params schedule=weekly Enable high-strength password policies for the cluster.
ncli cluster edit-hypervisor-security-params enable-high-strength-password=true Ensure CVMs require SSH keys for login instead of passwords https://portal.nutanix.com/page/documents/kbs/details?targetId=kA0600000008gb3CAA
정답: To configure the storage on the cluster for the distributed application, you can follow these steps:
Log in to Prism Element of cluster A using the credentials provided.
Go to Storage > Storage Pools and click on Create Storage Pool.
Enter a name for the new storage pool, such as Distributed_App_Storage_Pool, and select the disks to include in the pool. You can choose any combination of SSDs and HDDs, but for low cost per GB, you may prefer to use more HDDs than SSDs.
Click Save to create the storage pool.
Go to Storage > Containers and click on Create Container.
Enter a name for the new container, such as Distributed_App_Container, and select the storage pool that you just created, Distributed_App_Storage_Pool, as the source.
Under Advanced Settings, enable Erasure Coding and Compression to reduce the storage footprint of the data. You can also disable Replication Factor since data resilience is provided at the application level. These settings will help you achieve low cost per GB for the container.
Click Save to create the container.
Go to Storage > Datastores and click on Create Datastore.
Enter a name for the new datastore, such as Distributed_App_Datastore, and select NFS as the datastore type.
Select the container that you just created, Distributed_App_Container, as the source.
Click Save to create the datastore.
The datastore will be automatically mounted on all nodes in the cluster. You can verify this by going to Storage > Datastores and clicking on Distributed_App_Datastore. You should see all nodes listed under Hosts.
You can now create or migrate your worker VMs to this datastore and run them on any node in the cluster.
The datastore will provide low cost per GB and high performance for your distributed application.
정답: To configure the cluster to meet the requirements for the new workload, you need to do the following steps:
Create a new VLAN with ID 667 on the cluster. You can do this by logging in to Prism Element and going to Network Configuration > VLANs > Create VLAN. Enter 667 as the VLAN ID and a name for the VLAN, such as 667_VLAN.
Create a new network segment with the network details provided. You can do this by logging in to Prism Central and going to Network > Network Segments > Create Network Segment. Enter a name for the network segment, such as 667_Network_Segment, and select 667_VLAN as the VLAN. Enter 192.168.0.0 as the Network Address and 255.255.255.0 as the Subnet Mask. Enter 192.168.0.1 as the Default Gateway and 34.82.231.220 as the DNS Server. Enter cyberdyne.net as the Domain Name.
Create a new IP pool with the IP range provided. You can do this by logging in to Prism Central and going to Network > IP Pools > Create IP Pool. Enter a name for the IP pool, such as 667_IP_Pool, and select 667_Network_Segment as the Network Segment. Enter 192.168.9.100 as the Starting IP Address and
정답: First, you need to open the Prism Central CLI from the Windows Server 2019 workstation. You can do this by clicking on the Start menu and typing “Prism Central CLI”. Then, you need to log in with the credentials provided to you.
Second, you need to run the two commands that I have already given you in Desktop\Files\Network\flow.txt.
These commands are:
net.update_vpc_traffic_config virtual_switch=vs1 net.update_vpc_east_west_traffic_config permit_vpc_traffic=true
These commands will update the virtual switch that carries the VPC traffic to vs1, and update the VPC east-west traffic configuration to allow only VPC traffic. You can verify that these commands have been executed successfully by running the command:
net.get_vpc_traffic_config
This command will show you the current settings of the virtual switch and the VPC east-west traffic configuration.
Third, you need to SSH directly to any AHV node (not a CVM) in the cluster and run the command:
ovs-vsctl show
This command will display an overview of the Open vSwitch configuration on the AHV node. You can copy and paste the output of this command to a new text file named Desktop\Files\Network\AHVswitch.txt.
You can use any SSH client such as PuTTY or Windows PowerShell to connect to the AHV node. You will need the IP address and the credentials of the AHV node, which you can find in Prism Element or Prism Central.
remove # from greens
On AHV execute:
sudo ovs-vsctl show
CVM access AHV access command
nutanix@NTNX-A-CVM:192.168.10.5:~$ ssh [email protected] "ovs-vsctl show"
Open AHVswitch.txt and copy paste output